Scraping larger and cheaper Street View images from the JS API
UPDATE: Version 2 now available
For an improved version of this project, see https://loichovon.com/posts/streetview-scraper-v2.html
Final Result
Disclaimer: This is most definitely against the Maps Platform's Terms of Service and should therefore be used at your own risk of ban or retribution. This article also doesn't address the morality of skirting the ToS in this manner. I have used this to gather a dataset for academic research purposes, which I personally think is fair game.
 Image 1: Example comparison of equivalent images taken from the static API and the JS API
Features:
- Cheap scraping of Street View images (0.014 USD per location - theoretically lowerable to 0.014 USD for any number of locations if you extend this).
- Launch multiple parallel workers.
- Automatically get multiple angles and different time periods for a location.
- Arbitrarily sized images without watermarks.
Get the code here: https://github.com/lhovon/streetview-scraper-v1
Intro
I had to collect a streetview image dataset for a project at work (I work for a research project trying to do large scale deep energy retrofits in Quebec) to use with/train computer vision models to automatically detect certain building features. Stay tuned for an upcoming post about some cool experiments we did with them!
I wanted multiple angles of each building, like when moving around in Street View, as well as images from previous time periods. Doing this with the Static API was cumbersome.
AFAIK, only the javascript API sends back the IDs of the links (the arrow controls to adjacent panoramas) when you call StreetViewService.getPanorama() and of the other time periods (covered in the Time Travel article).
After failing to use projects like Js2Py, I resorted to using Selenium to load the JS API. For a given location, I could now get the panorama IDs for the links and the previous time periods. For each other time period, I had to get their links separately. Finally, for each panorama I had to calculate the heading (camera facing direction) before finally requesting them through the static API. This was quite expensive at 0.007 USD per image. I racked up a $800 bill scraping images for ~10,000 buildings. In addition, the images were only 640x640 pixels.
Note: there might be a way to do this using Google's backend API directly like
robolystis doing here but I did not have the time (nor motivation) to try this.
At some point, I realized I could do everything from the JS API if I could take screenshots from a headless browser. It would even be cheaper, since Google only charges to initialize the Street View container, and not for subsequent panorama changes.
Building on top of the last post's Street View screenshotting functionality, we'll use Selenium to load the JS API and scrape images, automatically moving around using the links and changing time periods. Here we load a new container for each place of interest, but you could easily abuse this further by calling StreetViewService.getPanorama() for each of your locations, followed by StreetViewPanorama.setPano() always on the same container.
Using this little workaround, we can scrape arbitrarily-sized images for a fraction of the cost. The tradeoff is paid in time, as going through Selenium is much slower than using the Static API. Additionally, I've found the need to wait between screenshots when moving around, to give the container enough time to fully update. Taking 10 screenshots at a single location takes about 30 seconds. However, we can parallelize going over multiple locations as each Selenium instance is fully independent.
Development
The last two posts about Google Maps cover aspects of this post in detail. In the Time Travel post we see how to initialize the Street View container and change between the available time periods for a location, and in the screenshot post we see how to use html2canvas to take clean screenshots. We won't cover everything here so if anything is confusing, try going through these posts!
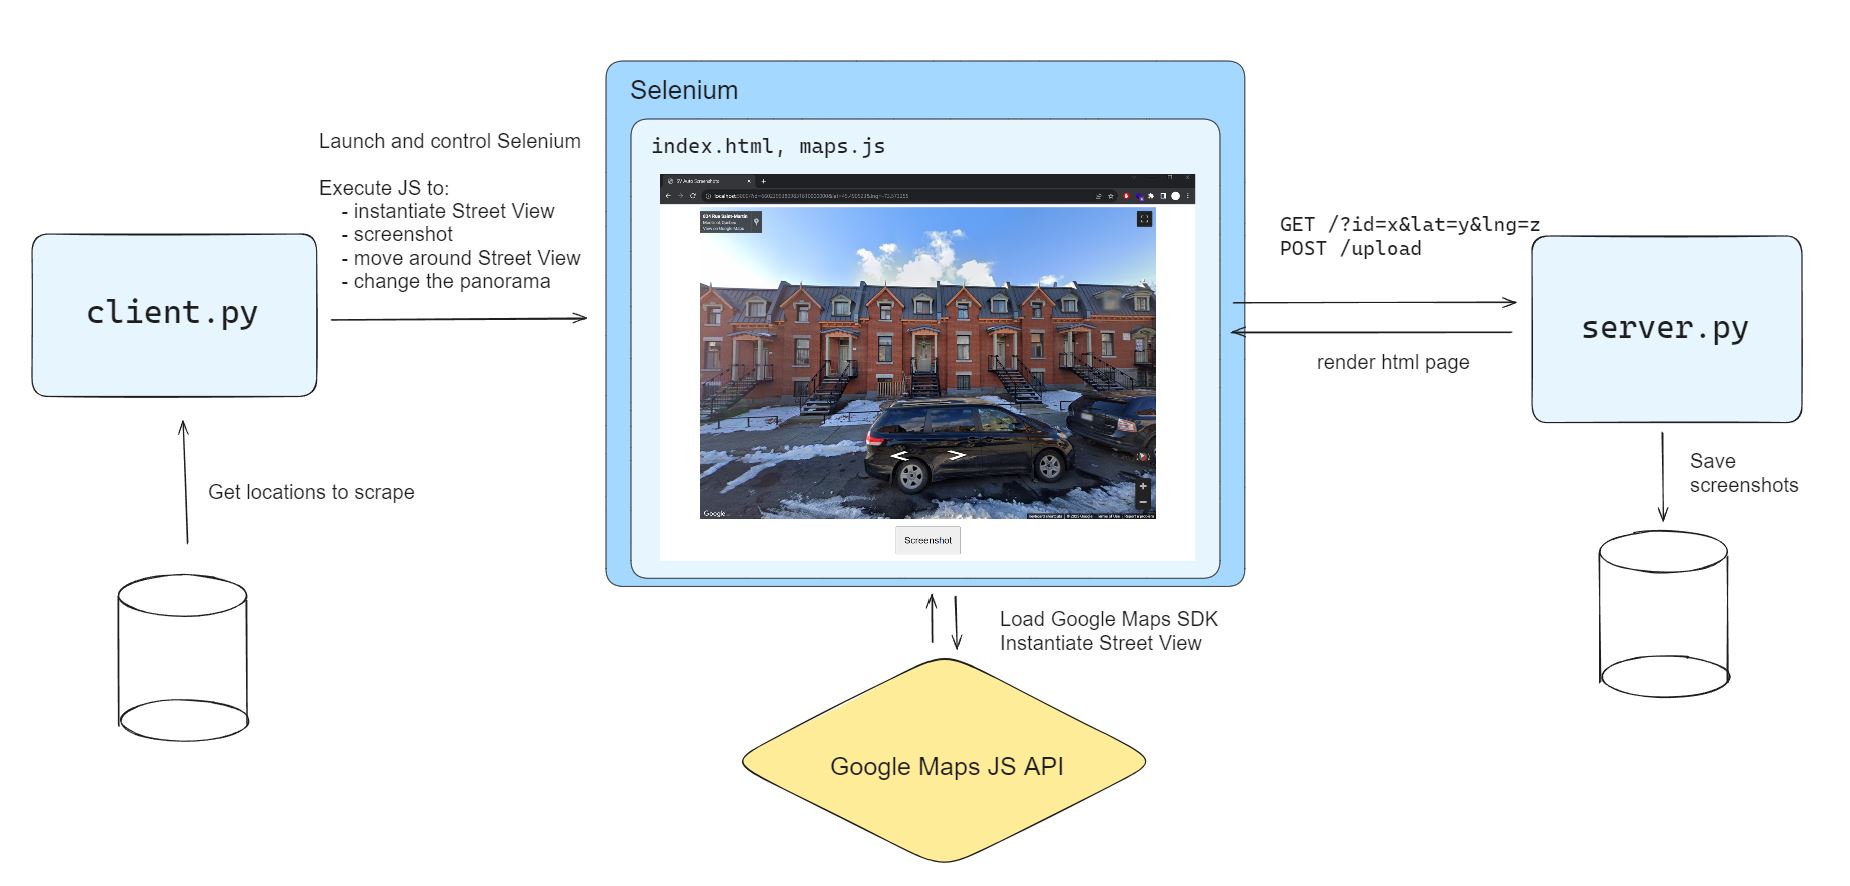 Image 2: System architecture diagram. We use a headless browser like Selenium to be able to execute the Javascript needed to load the Maps JS API and take screenshots. Using Javascript we can also interact with Street View to change position, zoom, heading, etc.
Starting from this base, we'll setup a simple flask web server with two REST endpoints: GET / which serves the screenshot view, and POST /upload which will save the screenshots to disk. The server generates web pages dynamically by rendering jinja2 templates and substituting in any variables for their values. This allows us to pass data from the server to the frontend, and to the Javascript executing in the browser.
The frontend needs a few things: a Maps API key and the coordinates of the place we're interested in. I've also added an identifier to simplify naming the screenshots.
# server.py
from flask import Flask, render_template, request

app = Flask(__name__)
MAPS_API_KEY = "YOUR_API_KEY" # Hide this in a .env file

@app.route("/", methods=['GET'])
def screenshot():
    id = request.args.get('id')
    lat = request.args.get('lat', 45.531776760335504) # default values if none
    lng = request.args.get('lng', -73.55924595184348)
    return render_template('index.html', id=id, lat=lat, lng=lng, key=MAPS_API_KEY)
From the template, we pass the data to the Javascript with data attributes:
<!-- templates/index.html -->
...
<script src="{{ url_for('static', filename='scripts/screenshot.js') }}"
    data-id="{{ id }}">
</script>
<script src="{{ url_for('static', filename='scripts/maps.js') }}"
    data-lat="{{ lat }}"
    data-lng="{{ lng }}">
</script>
and we retrieve them in the JS through document.currentScript.dataset:
// static/scripts/maps.js
const mapsData = document.currentScript.dataset;
let coordinates = {
    lat: parseFloat(mapsData.lat), // data attributes are String
    lng: parseFloat(mapsData.lng),
};
... // load the embedded Street View container
Passing data from the JS to the server is easy using fetch. When the screenshot button is clicked, we'll send the image to the /upload endpoint, along with a few other things.
async function screenshotStreetview(e) {
    e.preventDefault();
    const postData = {
        id: dataset.id,
        pano: window.sv.getPano(),
        date: document.getElementById('current-date').innerText,
        img: await screenshot('streetview'),
    }
    fetch("/upload", {
        method: "POST",
        mode: "same-origin",
        cache: "no-cache",
        credentials: "same-origin",
        headers: {
          "Content-Type": "application/json",
        },
        body: JSON.stringify(postData),
    }).then(() => alert('OK')); // alert will be used by Selenium to know if upload was successful
}
We also need to pass data to Selenium. We'll simply store it in the DOM and scrape it. We're passing Selenium the list of available panoramas from all available time periods at the location, the current panorama and current date.
svService.getPanorama(panoRequest, (panoData, status) => {
if (status === StreetViewStatus.OK) {
    const panoId = panoData.location.pano;
    const panoDate = getPanoDate(panoData.imageDate); // Converts date format
    const otherPanos = getOtherPanosWithDates(panoData.time); // Converts date format
    const heading = spherical.computeHeading(panoData.location.latLng, coordinates);
    // This is charged .014 USD
    const sv = new StreetViewPanorama(document.getElementById('streetview'), {
        position: coordinates,
        center: coordinates,
        zoom: 0,
        pov: {pitch: 0, heading: heading}
    });
    sv.setPano(panoId);

    // Save these in window for easy access later
    window.sv = sv;
    window.computeHeading = spherical.computeHeading;
    // Store these in the document for the client to access
    document.getElementById('initial-position-pano').innerText = panoId;
    document.getElementById('current-date').innerText = panoDate
    document.getElementById('other-panos').innerText = JSON.stringify(otherPanos);
}});
As we said, we'll use Selenium so we can execute javascript and load the street view. We define a simple class for the client. The window_size parameter impacts the screenshot size (screenshots are slightly smaller in width than the window size e.g. 1901x1080 for 1920x1080 window size). Taking screenshots is as easy as clicking the button through Selenium.
class StreetviewScreenshotClient():
    def __init__(self, window_size="1920,1080"):
        chrome_opts = chrome.options.Options()
        chrome_opts.add_argument(f"window-size={window_size}") # Impacts the picture size
        chrome_opts.add_argument("--log-level=3") # hide logs
        chrome_svc = chrome.service.Service(log_output=os.devnull) # hide logs
        self.driver = chrome.webdriver.WebDriver(service = chrome_svc, options=chrome_opts)
        self.wait = WebDriverWait(self.driver, 10)

    def take_screenshot(self):
        self.driver.find_element(By.ID, 'btn-screenshot').click()
        self.wait.until(EC.alert_is_present()) # alert thrown after the fetch()
        self.driver.switch_to.alert.accept()
        time.sleep(.5)
We can use WebDriver.execute_script() to interact with the Street View container from Selenium.
For example, we can move right by executing the following script. The div.gmnoprint.SLHIdE-sv-links-control query selector is likely specific to v3.53 of the Maps API and may need to be changed in the future. I'm using a heuristic to find the correct link here, so this does not work 100% of the time but is good enough. We have a similar script to move left.
JS_MOVE_RIGHT = """
    const links = document.querySelector('div.gmnoprint.SLHIdE-sv-links-control').firstChild.querySelectorAll('[role="button"]');
    var index = 0;
    if (links.length === 2 || links.length === 3)
        index = 0;
    else if (links.length === 4)
        index = 1;
    links[index].dispatchEvent(new Event('click', {bubbles: true}));
"""
In order to keep facing towards the point of interest, we need to recompute the headings every time we move. We do this easily with the google.maps.geometry.spherical.computeHeading function that we conviently made available through window. We can optionally pass a pitch paramater when calling it from the client.
JS_ADJUST_HEADING = """
    window.sv.setPov({
        heading: window.computeHeading(window.sv.getPosition().toJSON(), window.coordinates),
        pitch: %s
    });
"""
In the client we use these scripts like this:
class StreetviewScreenshotClient():
    ...
    def move(self, direction, num_times=1):
        if direction == 'left':
            move_script = JS_MOVE_LEFT
        elif direction == 'right':
            move_script = JS_MOVE_RIGHT
        else:
            raise Exception('Left or Right only')

        for _ in range(num_times):
            self.driver.execute_script(move_script)
            time.sleep(.3)

    def readjust_heading(self, pitch=0):
        self.driver.execute_script(JS_ADJUST_HEADING % str(pitch))
        time.sleep(.5)
The sleep calls are necessary for the Street View container to fully update after interacting with it. These values were hand-tuned for my laptop so might have to be changed, e.g. increased for larger window sizes. Leaving them out results in blurry screenshots.
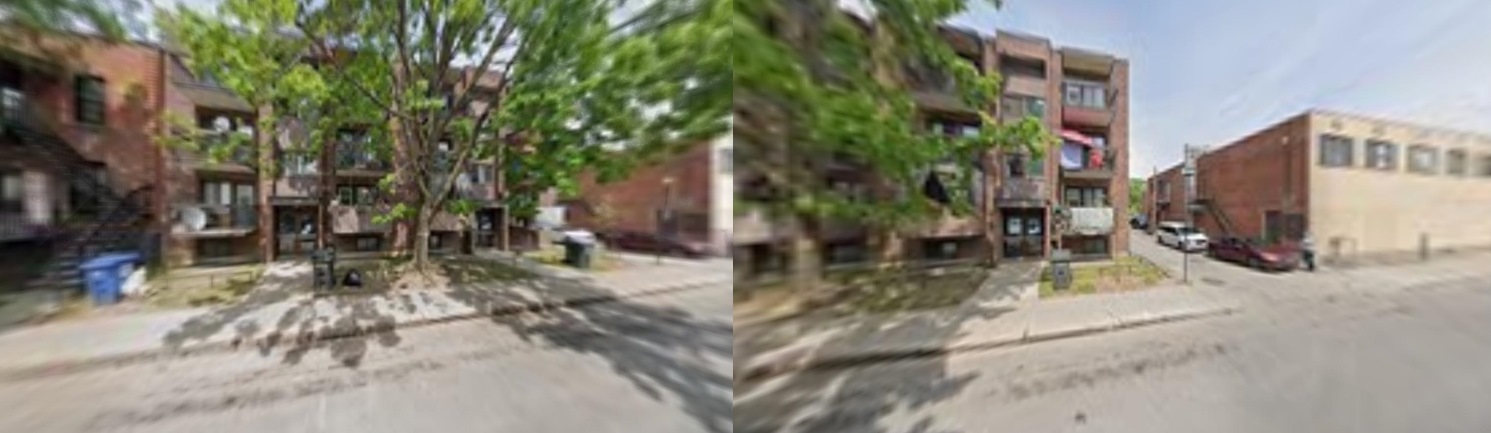 Image 3: Example of blurry screenshots when we don't sleep after moving around
We've stored the list of other panoramas available at the location in the DOM. This list gives the time period (Month - Year) of each panorama. I've made it so you can pass a function to select other available time periods to scrape. For example, we can select a winter month like this:
def select_one_winter_month(other_dates: list, panos_picked: set):
    additional_panos = []
    # We reverse the list because dates usually given in chronological
    # order but we're interested in more recent panoramas
    for date in reversed(other_dates):
        month = date['date'].split(' ')[0]
        if month in ['Nov', 'Dec', 'Jan', 'Feb', 'Mar', 'Apr']:
            # Avoid duplicate panos
            if date['pano'] in panos_picked:
                continue
            additional_panos.append(date)
            panos_picked.add(date['pano'])
            break
    return additional_panos
This selector function is then passed to the client's screenshot function. For each time period, the client is configured to take a screenshot at the initial positon, move right twice, reset its position and move left twice for a total of 5 screenshots.
class StreetviewScreenshotClient():
    ...
    def screenshot(self, id, lat=None, lng=None, additional_pano_selector=None):
        ...
        additional_panos = []
        panos_picked = set([current_pano])

        if other_panos_text := driver.find_element(By.ID, 'other-panos').text:
            other_panos = json.loads(other_panos_text)
            # Here we call the function to get the additional panos to scrape
            additional_panos = additional_pano_selector(other_panos, panos_picked)

        all_dates = [{'pano': current_pano, 'date': current_date}] + additional_panos

        for i, to_parse in enumerate(all_dates):
            pano, date = to_parse.values()
            if i > 0:
                self.set_date(pano, date)
            self.take_screenshots(zooms=zooms)

            self.move('right', num_times=1)
            self.readjust_heading(pitch = pitch_mod)
            self.take_screenshots(zooms=zooms)

            self.move('right', num_times=1)
            self.readjust_heading(pitch = pitch_mod)
            self.take_screenshots(zooms=zooms)

            self.reset_intial_position()

            self.move('left', num_times=1)
            self.readjust_heading(pitch = pitch_mod)
            self.take_screenshots(zooms=zooms)

            self.move('left', num_times=1)
            self.readjust_heading(pitch = pitch_mod)
            self.take_screenshots(zooms=zooms)
And that's pretty much it for core functionality. I've hardcoded 10 test cases in the POC code, but you would normally get them from a database. There's also code to launch multiple parrallel workers in order to speed up a larger scale scraping.
I've used this to scrape images of 2049 low-cost housing buildings in Quebec for a research project, obtaining 23,211 images in total. The resulting bill was around 50 CAD, or around 37 USD which is around 0.018 USD per location. Using the static API, this would have cost around 160 USD.
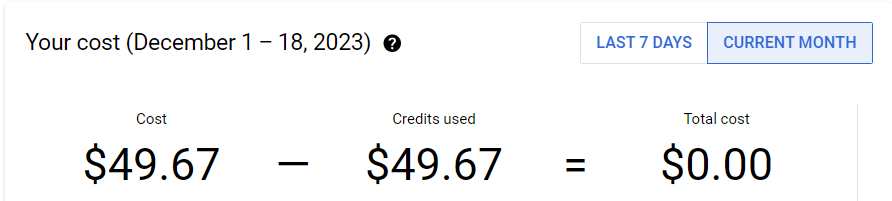 Image 4: Cloud console bill after scraping 23,211 pics of 2,049 locations (in Canadian dollars). Using the Static API, this would have been around 4 times higher.
TODO
For each of our buildings of interest, we also have a polygon of the lot boundaries. I'd like to extend this to automatically go around the lot and take screenshots covering as many sides of the building as possible vs only 1 side currently.
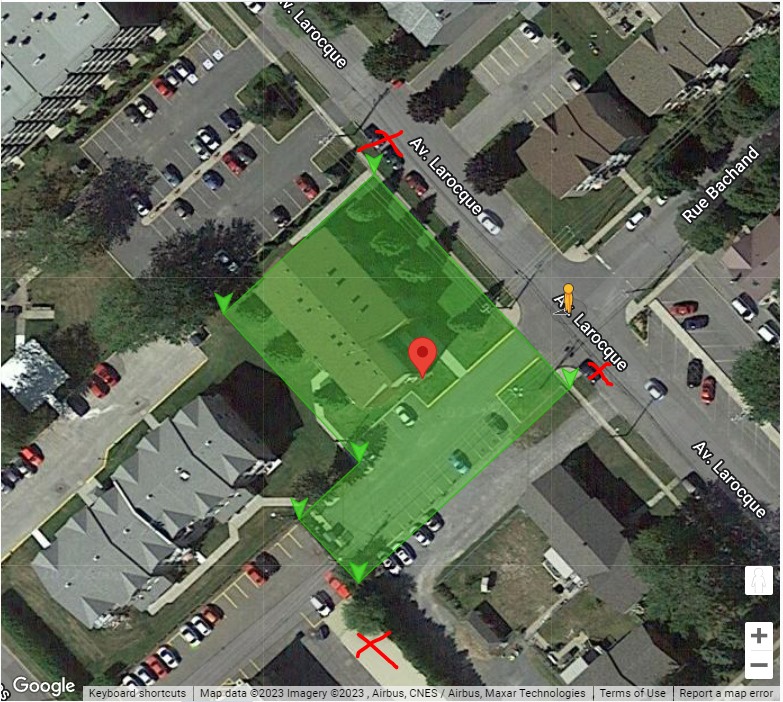 Image 5: Future developments include automatically moving to the edges of a lot polygon and taking pictures.